
QuickBooks Error 1904 is a common issue that many users encounter when attempting to install the QuickBooks Desktop software on their computers, and it can be quite frustrating to deal with. QuickBooks Desktop is a powerful accounting software, but occasionally, users encounter Error 1904 during installation.
This error typically displays the message
| “Error 1904: [file path / name / extension] failed to register.” |
In this guide, we will delve into the causes of this error and provide you with clear steps to resolve it.
Understanding QuickBooks Error 1904
QuickBooks Error 1904 is a specific error message that pops up during the installation process, indicating that there’s a problem with registering certain components of the software.
Error 1904 can be frustrating, but understanding its origins is the first step to resolving it effectively. This error can occur for several reasons –
- Damaged or corrupted company files – Error 1904 may arise if your company files become damaged or corrupted suddenly. Incorrect file settings can also contribute to this issue.
- Microsoft visual C++ component damage – You might encounter this error when specific files, such as dll, qbupdate.exe, among others, are mentioned. This problem is often caused by a damaged Microsoft Visual C++ component.
- Operating system upgrade – Upgrading your operating system, such as moving from Windows Vista to Windows 7, can trigger Error 1904 if you fail to reboot your computer after the upgrade.
Signs of QuickBooks Error Code 1904
Identifying the presence of Error 1904 is crucial for timely resolution. Look out for these signs:
- Missing crucial company files.
- Sluggish system performance.
- Automatic updates not functioning correctly.
- QuickBooks Error Code 1904, specifically the message “ICWrapper.dll Failed to Register,” represents a more precise variation of this error. It indicates that the ICWrapper.dll file, which is a critical component of QuickBooks, has encountered problems during the registration process. This issue can impact the proper functioning of QuickBooks and needs to be addressed to ensure smooth operation.
- Permission issues with the hard drive and other read-write devices.
- Repeated messages displaying “Error 1904: [file path / name / extension] failed to register.”
Error 1904 Module Failed to Register QuickBooks
When you come across Error 1904 Failed to Register QuickBooks, it means that some necessary files or modules failed to register correctly during the installation, potentially causing functionality problems.
This error can prevent QuickBooks Desktop from being installed or functioning properly. To address this issue, you can follow these general troubleshooting steps:
- Reboot your computer – Sometimes, a simple restart can resolve issues related to system files and processes.
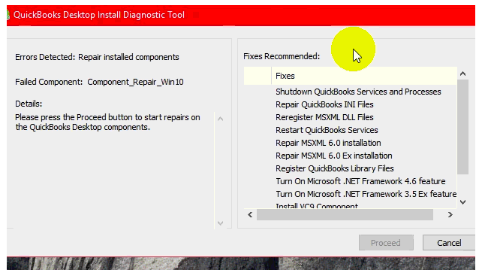
- Run the QuickBooks install diagnostic tool – Use the QuickBooks Install Diagnostic Tool provided by Intuit. This tool is designed to automatically identify and fix issues related to QuickBooks installations, including Error 1904.
- Install QuickBooks as administrator – Right-click on the QuickBooks installation file and choose “Run as administrator” to ensure that the installation process has the necessary permissions.
- Disable antivirus and firewall – Temporarily disable any antivirus or firewall software during the installation process. Sometimes, these security programs can interfere with the installation.
- Use a clean install – If you’ve attempted to install QuickBooks previously and encountered this error, you may need to perform a clean install. Uninstall QuickBooks, delete any remaining installation folders, and then reinstall it.
- Check windows updates – Ensure that your Windows operating system is up to date by installing any available updates.
- Verify microsoft .NET framework – Ensure that the required version of Microsoft .NET Framework is installed on your computer. If not, install it or repair it using the Microsoft .NET Framework Repair Tool.
- Check user permissions – Make sure you have the necessary permissions to install software on your computer. You should have administrative privileges.
- Manually register the module – In some cases, you may need to manually register the module that is failing to register during installation. You can use the Windows Command Prompt with administrative privileges to register the DLL file. The command is typically “regsvr32 <filename.dll>.”
- Check for system file corruption – Run the “sfc /scannow” command in the Command Prompt to check for and repair any corrupted system files.
- Contact QuickBooks support – If you’ve tried the above steps and still encounter the error, it’s advisable to contact QuickBooks support for more specific assistance. They may have additional troubleshooting steps or guidance tailored to your situation.
Resolving QuickBooks Desktop Error 1904 During Installation
QuickBooks Desktop is an essential tool for managing your finances, but occasionally, users encounter Error 1904 during the installation process. This error message can be frustrating, but fear not; we’ve laid out detailed steps below to help you troubleshoot and resolve this issue effectively.
Solution 1 – Run the QuickBooks Install Diagnostic Tool
- When the error message pops up during installation, select the “Ignore” option. This allows the QuickBooks installation to continue without interruption.
- After ignoring the error, restart your computer. This step helps clear any temporary issues that may be causing the error.
- If the installation still didn’t complete successfully, download and run the QuickBooks Desktop Install Diagnostic Tool. This tool is designed to identify and fix installation-related problems.
- After using the diagnostic tool, reboot your computer once again to ensure all changes take effect.
- If the previous steps didn’t resolve the issue, you can try installing QuickBooks under the built-in Administrator account.
Solution 2 – Activate the built-In administrator account
Follow these steps to activate the built-in administrator –
Step 1 – Activate the built-in administrator
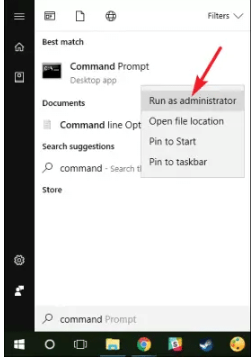
- To begin, press the Windows key on your keyboard.
- Type “CMD” in the search bar, right-click on “CMD” or “Command Prompt,” and choose “Run as Administrator.”
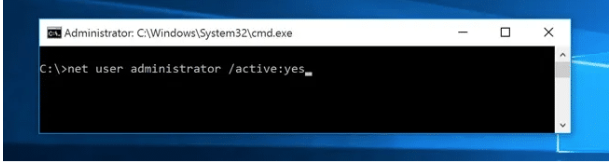
- In the command prompt window, you can enable the built-in Administrator account by typing the following command:
| net user administrator /active:yes |
- Press Enter to execute the command. If you encounter any errors, you can try using the command without specifying “:yes” like this –
| net user administrator /active |
This will enable the built-in Administrator account without explicitly setting it to “yes.”
Step 2 – Switch to the built-in administrator account
- Simultaneously press Ctrl, Alt, and Delete keys on your keyboard. For Windows 8 users, click the Windows button and select the user icon in the upper right corner.
- After pressing Ctrl+Alt+Delete, choose the default Administrator account.
Step 3 – Hide the built-in administrator account
- Press the Windows key on your keyboard.
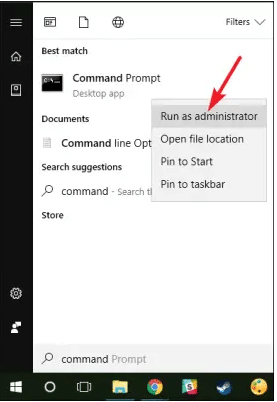
- Type “CMD” in the search bar.
- Right-click on “CMD” or “Command Prompt.”
- Choose “Run as Administrator.”
- In the command prompt window, input the following command:
| net user administrator /active:no |
- Press Enter, and this command will hide the built-in Administrator account.
Step 4 – Change installation directory security settings
- Navigate to “C:\Program Files\Common Files.”
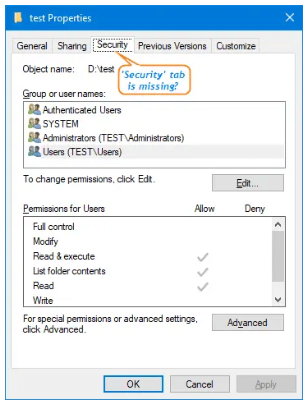
- Right-click on the “Common Files” folder and select “Properties.”
- Under the “Security” tab, click the “Edit” button, and then choose “Users” from the “Group or user names” list.
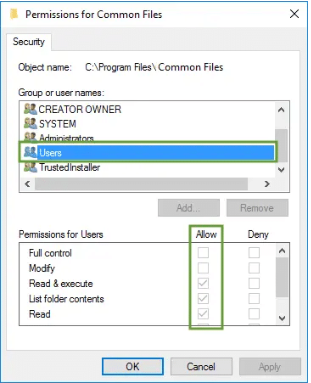
- Under “Permissions for users,” select “Allow” for the following permissions –
- Modify
- Read and Execute
- List Folder Contents
- Read
- Write
Step 5 – Reinstall QuickBooks
After adjusting security settings, attempt to install QuickBooks Desktop once more. Once the installation is complete, switch back to your original user login.
If you’ve diligently followed all the steps and continue to encounter the same error, it’s advisable to contact QuickBooks experts for a more in-depth diagnosis of the issue.
Solution 3 – involves manually configuring damaged Windows components, and it consists of two critical steps –
Step 1: Repair the .NET Framework.
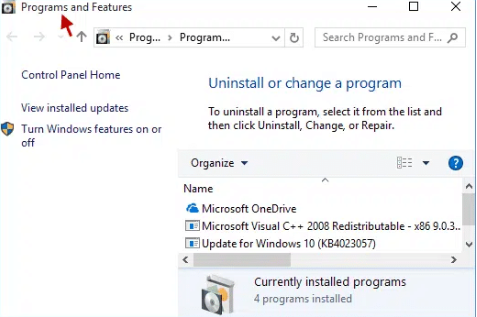
- Navigate to the Control Panel to resolve issues related to Microsoft .NET Framework.
- In the list of installed programs, select .NET Framework.
- Proceed to the Programs and Features page.
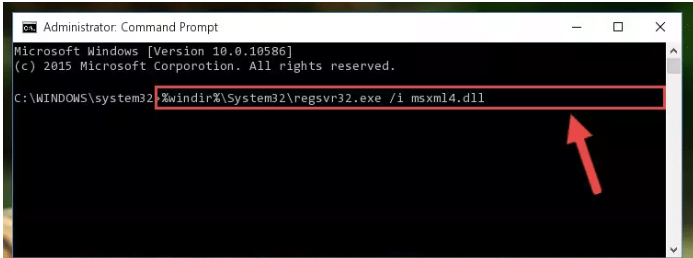
Step 2: Register the MSXML.dll.
For 64-Bit OS
- Click on the Start button.
- Enter “CMD” into the search bar.
- Right-click the CMD icon and select “Run as Administrator.”
- In the Command Prompt window, enter “cmd” to get to the C: root directory.
- Press “CD windows/syswow64/” to locate syswow64.
- Type “regsvr32 MSXML6.dll” and hit Enter.
- Try installing QuickBooks and check if the issue persists.
For 32-Bit OS
- Press Windows + R to open the Run window.
- Type “cmd” into the box and hit Enter.
- Enter “regsvr32 MSXML6.dll” and press Enter to proceed.
Solution 4 – Updating the operating system
For Windows 10
- Click the Windows Start button.
- Go to “Update & Security.”
- Select “Windows Update.”
- Click “Check for Updates” to see if any updates are available.
- Choose the updates you want and click “Update.”
- Reboot your system.
- Launch QuickBooks after the upgrade is complete to check if the issue is resolved.
For Windows 8.1
- Access the Settings.
- Click “Change PC settings.”
- Navigate to “Update & Recovery” and select “Windows Update.”
- Click “Check Now.”
- Choose “View Details” to see available updates.
- Select the appropriate updates.
- Reboot your system after the updates finish.
- Log in to QuickBooks again.
Additional alternatives to xix QuickBooks installation error 1904 (Failed to register)
- Examine your antivirus or security software settings.
- Optimize your internet bandwidth for accurate installation source downloads.
- In multi-user mode, uncheck the shared updates option.
Special Cases and Additional Solutions for Resolving QuickBooks Desktop Error 1904
QuickBooks Desktop is a powerful accounting tool, but when confronted with Error 1904, it’s important to explore various scenarios and additional solutions for a seamless experience. In this guide, we’ll delve into special cases and supplementary fixes to help you overcome this error.
Condition 1 – Bitdefender presence
Solution – To ensure successful QuickBooks installation with Bitdefender –
- Add “C:\Program Files\Common Files” (for 32-bit systems) or “C:\Program Files\Intuit” (or “C:\Program Files(x86)\Intuit” for 64-bit systems) to the Bitdefender exclusion list.
- Note that disabling Bitdefender won’t resolve this issue; adding exceptions is essential.
Condition 2 – Error during Adobe Flash Player installation
Solution – If the error occurs during Adobe Flash Player installation –
- Download and install the QuickBooks Install Diagnostic Tool on your system.
- Uninstall Adobe Flash Player:
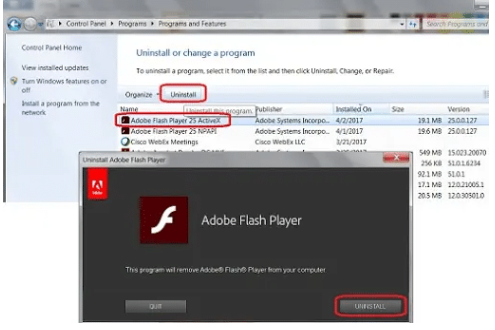
- Press “Windows + R” to open the Run window.
- Type “Control Panel” and click “OK.”
- Select “Uninstall a program.”
- Choose “Adobe Flash Player ActiveX” and click “Uninstall.”
- Follow the on-screen instructions to complete the process.
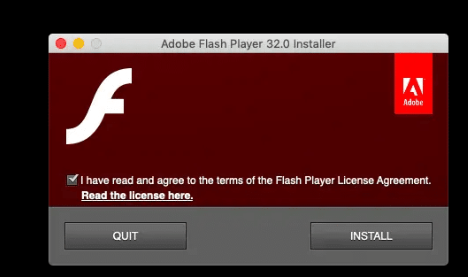
- Download and install Adobe Flash Player from the official website at www.adobe.com.
Condition 3 – Error references QBversionTool.dll
Solution 1 – Use QuickBooks install diagnostic tool –
- Download and run QuickBooks Install Diagnostic Tool.
- Reboot your computer and reinstall QuickBooks.
Read Also: How to Resolve QuickBooks Update Error 12007?
Solution 2 – Verify permissions and use the hidden (built-in) administrator account. Create a notepad file and save it to the installation directory for permission verification.
- Open the Run window by pressing “Windows + R” simultaneously.
- Type “Notepad” and click “OK.”
- Type “QBTEST” in the notepad file.
- From the “File” menu, select “Save As” and save the file to the installation directory –
| For 32-bit: C:\Program Files\Common FilesFor 64-bit: C:\Program Files(x86)\Common Files |
Additional Guidelines –
- If you are working with QB Database Manager only, these solutions may not be effective; consider installing the actual exe.
- The error often occurs in Microsoft Windows when installation is not done with admin credentials.
- Before proceeding with the installation of Avalara Avatax, make sure to install the .exe file on the server. It’s essential to ensure that the connector is not installed on a server where QuickBooks (.exe) is not present.
- After encountering an error message, click OK, and the installation process should confirm its successful completion.
- When using AvaTax Configuration (located under File > AvaTax > Configuration), be sure to run QuickBooks Software as an Administrator and select the Test Connection option for proper setup and testing.
Conclusion
In conclusion, addressing QuickBooks Error 1904 can be a straightforward process when you consider these special cases and additional guidelines. If you still encounter challenges or need expert assistance, our certified ProAdvisors are here to provide top-notch QuickBooks technical support.
Frequently Asked Questions
What is QuickBooks Error 1904?
QuickBooks Error 1904 is a common installation error that occurs when the system is unable to register certain QuickBooks components properly.
What causes QuickBooks Error 1904?
QuickBooks Error 1904 is typically caused by issues with the installation of QuickBooks or the failure to register specific DLL files during the installation process.
How do I fix QuickBooks Error 1904?
To resolve QuickBooks Error 1904, you can try reinstalling QuickBooks, repairing the Microsoft .NET Framework, or using the QuickBooks Install Diagnostic Tool.
What is “icwrapper.dll” in QuickBooks Error 1904?
“icwrapper.dll” is a specific DLL file that can cause QuickBooks Error 1904 when it fails to register during the installation of QuickBooks.
How can I manually register “icwrapper.dll” to fix QuickBooks Error 1904?
You can manually register “icwrapper.dll” by using the Windows Command Prompt with administrative privileges. Detailed instructions are available online.
What is the role of the QuickBooks Install Diagnostic Tool in fixing Error 1904?
The QuickBooks Install Diagnostic Tool is a utility developed by Intuit to automatically identify and resolve problems associated with QuickBooks installation errors, including the commonly encountered Error 1904.
Why do I encounter Error 1904 during QuickBooks installation?
QuickBooks Error 1904 can occur due to conflicts with existing software, damaged installation files, or issues with the Windows operating system.
Can a corrupt Windows user profile cause QuickBooks Error 1904?
Yes, a corrupt Windows user profile can contribute to QuickBooks Error 1904. You may need to create a new user profile to resolve the issue.
Is QuickBooks Error 1904 specific to QuickBooks Desktop?
Yes, QuickBooks Error 1904 is primarily associated with QuickBooks Desktop versions.
What is the difference between QuickBooks Error 1904 and Error 1935?
QuickBooks Error 1904 is related to the registration of DLL files during installation, whereas Error 1935 is typically related to issues with the Microsoft .NET Framework during installation.
How can I prevent QuickBooks Error 1904 during future installations?
To prevent QuickBooks Error 1904, ensure that your system meets the QuickBooks system requirements, update Windows, and keep your QuickBooks software up to date.
Is there a QuickBooks support hotline for assistance with Error 1904?
Yes, you can contact QuickBooks support for assistance with QuickBooks Error 1904. They can provide guidance and troubleshooting steps specific to your situation.