
Are you ready to streamline your billing process and ensure you get paid on time? Create an invoice in QuickBooks is a breeze! In this guide, we’ll walk you through the simple steps to generate professional invoices that impress clients and keep your cash flow steady. Let’s dive in!
Create an Invoices in QuickBooks Desktop: A Step-by-Step Guide
Efficiently managing your invoices is crucial for your business’s financial health. QuickBooks Desktop offers multiple pathways to generate invoices, whether you’re starting from scratch or have sales orders and estimates in hand. This guide walks you through the process in a clear and user-friendly manner.
Three Ways to Create Invoices:
- From Scratch: Craft invoices without prior sales orders or estimates.
- From Sales Orders or Estimates: Convert pre-existing sales orders or estimates into invoices.
- Copy Last Invoice: Duplicate a previous invoice and update it with current details.
- Creating an Invoice from Scratch –
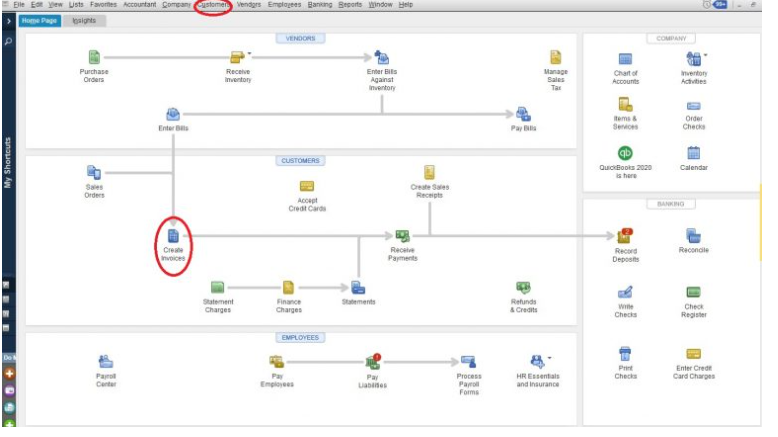
Access Invoice Creation – To initiate the process of creating an invoice, start by selecting the “Create Invoices” option either from the main screen or the Customers menu.
Select Customer and Job – You should pick the appropriate customer and job from the “Customer: Job” dropdown menu. If the customer or job information is not already available in your QuickBooks, you can easily add it during this step.

Template Customization – Opt for a suitable template from the Template option. Tailor your invoice style as per customer preferences.
- Invoice Details Setup – Set essential fields –
| Date | Verify the invoice date. |
| Invoice Number | Modify it if needed, avoiding duplicates. |
| Bill to, Ship to | Adjust addresses if required. |
| P.O. Number | Enter customer’s purchase order number. |
| Terms | Choose appropriate payment terms |
| Rep, Ship, Via, F.O.B | Customize or leave fields blank if not applicable. |
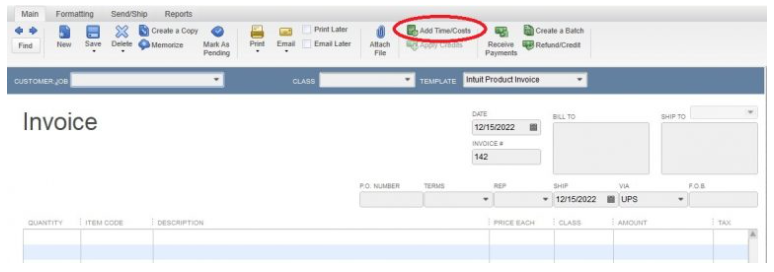
Adding Products/Services – Populate the invoice with:
- Time/Costs: Automatically include billable time or costs.
- Quantity, Item Code, Description, Price Each, Class, Amount: Enter manually or use pre-set products/services.
Sales Tax Handling – Specify tax rates per item using the “Tax” column dropdown menu.
Completing Invoice Sections – Fill in the required details –
- Customer Message and Memo: Add custom messages or memos.
- Customer Tax Code: Select the correct tax code.
- Tax: Set tax rate for the entire invoice.

Delivery Options – Choose how to send the invoice:
- Print and Mail: Select print options or save as a PDF.
- Email: Configure email preferences in settings.
- Later Options: Print/email later or in a batch.
- Attach Files: Add attachments if necessary.
Review and Save –
- QuickBooks Desktop handles calculations but verifies accuracy.
- Click “Save & Close” or “Save & New Invoice.”
- Avoid clicking “Clear” to prevent data loss.
- Creating Invoices from Sales Orders:
Understanding the Sales Order Workflow – A sales order represents a future sale commitment that is yet to be fulfilled. Businesses utilize the sales order feature in QuickBooks Desktop to track these upcoming transactions.
Step-by-Step Process:
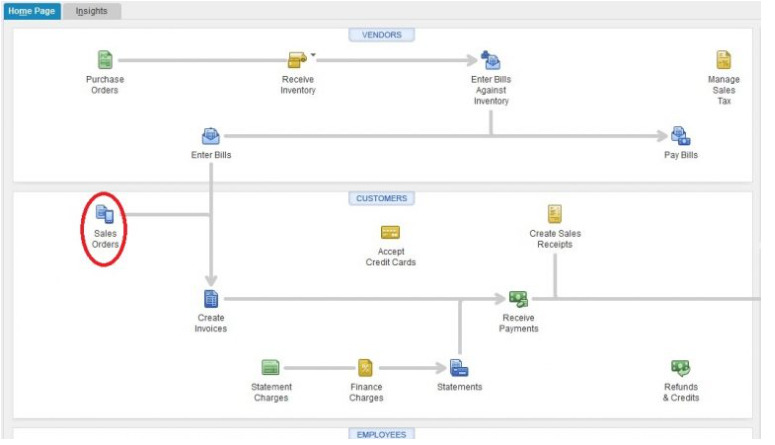
- Begin by clicking on the “Sales Orders” icon located on the home screen.
- Upon clicking, you’ll be directed to the Sales Order form interface.
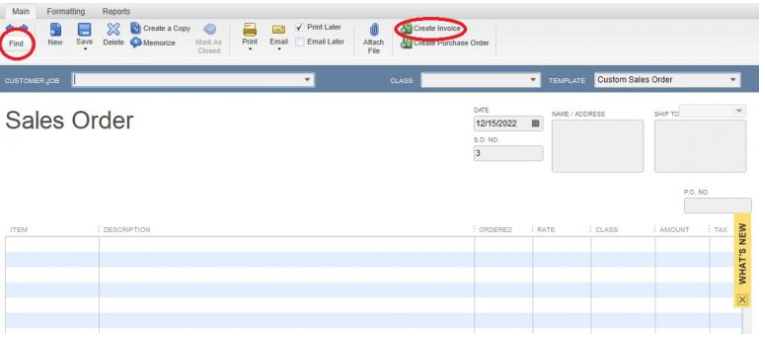
- Utilize the “find” button to locate the specific sales order for which you intend to generate an invoice.
- Locate the desired sales order and click on the “Create Invoice” icon.
- A pop-up window will emerge, presenting you with two options:
- Create an invoice for all sales orders.
- Create an invoice for selected items.
- Choose the relevant option and proceed by clicking “OK.”

- If you opt to create an invoice for selected items, a new pop-up box will appear.
- Tailor your invoice by choosing the specific things you wish to invoice at this moment.
- Click “OK” once you’ve made your selections.

- Upon proceeding, you will find yourself on an invoice screen filled with the details imported from the sales order. Within this interface, you have the freedom to make adjustments, fine-tune the invoice, and send it according to your specific business requirements, following the steps we discussed in the previous section.
- Creating Invoices from Estimates
Understanding the transition – Estimates serve as preliminary cost projections for potential projects or customers. QuickBooks Desktop facilitates the seamless conversion of estimates into functional invoices.
Step-by-Step Breakdown
- Select the “Estimates” icon. It is available on the home screen.
- Upon clicking, you’ll be directed to the Estimates interface. This is where you can manage your estimated records.
- Locate the specific estimate you intend to convert into an invoice.
- Click on the “Create Invoice” option associated with that estimate.
- Unlike sales orders, estimates are converted into single invoices, with a one-to-one correspondence.
- When employing progress invoicing, which is useful for billing in stages, you will receive a notification asking you to indicate the portion of the estimate you intend to bill for during this specific instance.
- This process resembles the selection of items for inclusion in an invoice generated from a sales order.
Create an Invoice in QuickBooks Online: A User-Friendly Guide
Create invoices in QuickBooks Online mirrors the simplicity of its desktop counterpart. Discover how to effortlessly generate invoices that streamline your business transactions and foster prompt collections.
- Design invoices from scratch or transform estimates into invoices, aligning with your specific needs.
- Unlike the desktop version, QuickBooks Online doesn’t offer a sales order feature.
- Create an Invoices in QuickBooks Online:
Generate invoices in QuickBooks Online with ease, whether you’re starting from scratch or utilizing existing estimates. Follow these steps –
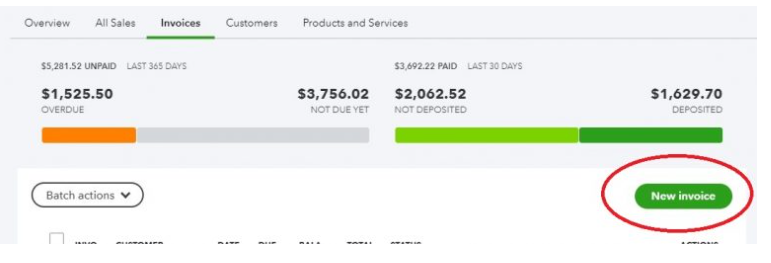
- Access a blank invoice screen through two methods:
- Click the “+” icon at the top right corner of your dashboard, then select “Invoice” from the Customers options.
- Navigate through “Sales” and “Invoices” on the left toolbar.

- Choose either of the above methods to be directed to a blank invoice interface.
- Choose a customer from the dropdown menu or add a new one on the spot.
- Populate the customer’s email field; include multiple email addresses if needed.
- Select the “send later” checkbox to schedule batched invoice emails.
- Enable QuickBooks Payments for convenient payment options.
- The billing address auto-populates; manual entry is available.
- Pick appropriate payment terms from the dropdown menu.
- Set the invoice date; adjust it if necessary.
- Due date auto-calculated based on terms; manual adjustment is possible.
- Customize the template using the “customize” link at the bottom.
- Fill in product/service details, descriptions, quantities, and rates.
- The amount field auto-calculates or can be manually adjusted.
- Checkbox for taxable items; unchecked items are tax-free.
- Add lines or subtotals to organize the invoice.
- Include personalized messages on the invoice.
- Configure discount application before or after tax calculation.
- Choose the sales tax rate or add a new rate on the fly.
- Apply percentage or flat dollar discounts if needed.
- Attach files by dragging or using the icon.
- Save progress frequently to prevent data loss.
- Access print, preview, and recurring invoice setup options.
- Save and send your invoice with various save options.
- Creating Invoices from Estimates in QuickBooks Online:
Optimize your invoicing process by initiating it directly from project estimates. QuickBooks Online’s progress billing feature empowers you to streamline project-based invoicing.
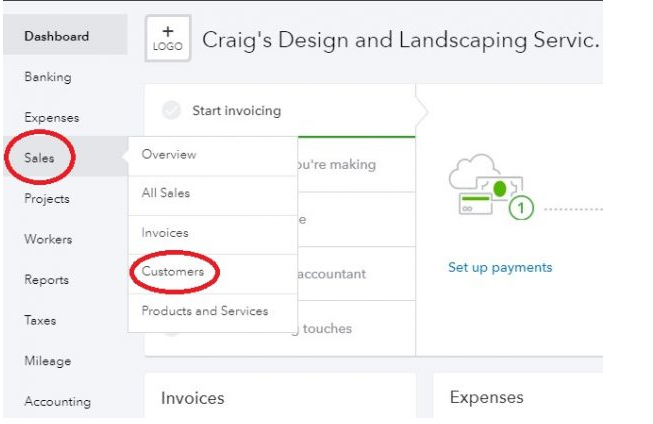
- Begin by navigating to the left toolbar and hovering over the “Sales” link.
- Click on “Customers” to proceed.
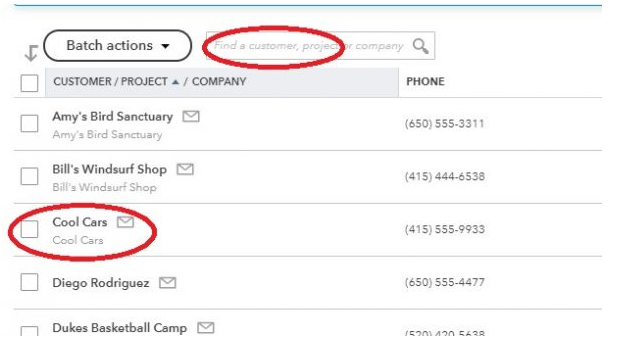
- On the subsequent screen, choose the customer by clicking their name from the list or utilizing the search feature in the “Find” box.
- Identify the specific estimate you intend to convert into an invoice.
- In the Action column, click on the “create invoice” link associated with that estimate.

- A new invoice screen will open, pre-populated with the details from the chosen estimate.
- For progress invoicing scenarios, you can select either a percentage or a specific quantity of the overall estimate to include in this invoice.
- Follow the steps outlined in the previous sections to customize the invoice details.
- Tailor the invoice to reflect accurate project information, rates, descriptions, and any applicable discounts.
Creating an invoice in QuickBooks isn’t just about sending a bill; it’s about professionalism, transparency, and securing your earnings. The straightforward process lets you focus on your work, knowing that your billing is in capable hands.
You May Read Also: How to Create a Budget in QuickBooks
Frequently Asked Questions
Can I customize the look of my invoices in QuickBooks?
Yes. QuickBooks offers customization options, allowing you to add your logo and choose a template that aligns with your brand.
Can I send invoices for different currencies?
Yes, QuickBooks supports invoicing in various currencies, making international transactions a breeze.
Can I set up recurring invoices?
Certainly! QuickBooks allows you to create templates for recurring invoices, saving you time and ensuring consistent billing.
Is it possible to add attachments to invoices?
Yes. QuickBooks lets you attach documents, such as contracts or project details, to invoices for clarity and transparency.
Can I schedule automatic invoice reminders?
Yes, QuickBooks enables you to set up automated reminders, reducing the need for manual follow-ups and improving payment punctuality.
What if I make a mistake in the invoice details?
Yes. QuickBooks allows you to edit and update invoices even after they’re sent, ensuring accuracy throughout the process.
Can I convert estimates to invoices?
Indeed, QuickBooks lets you easily convert estimates into invoices, saving time and maintaining consistency in your billing process.
How can I handle partial payments or deposits?
QuickBooks offers the flexibility to record partial payments or deposits, ensuring accurate tracking of transaction progress.